Tutorials
Making a base with Aves® ClayShay:
Dec
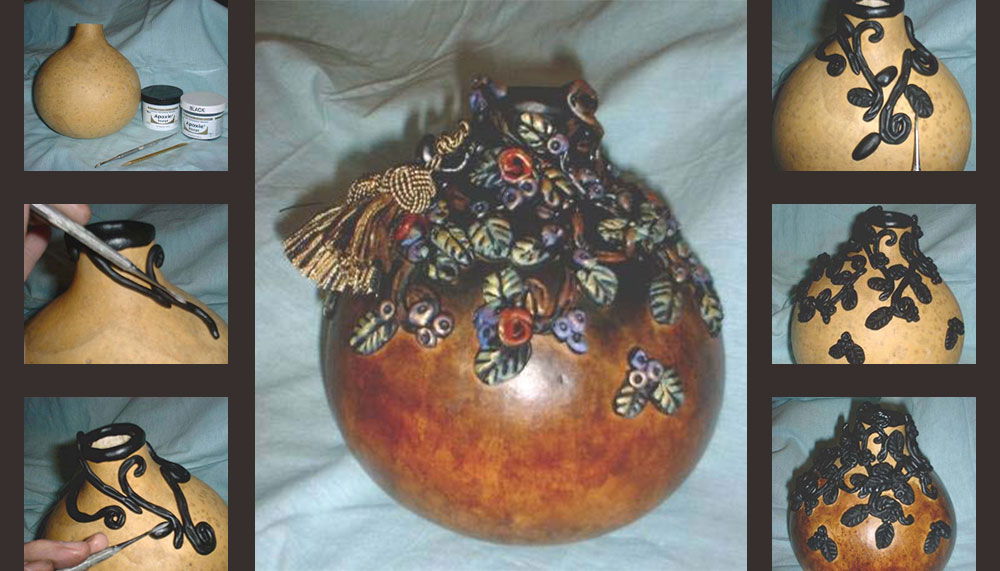
Time to customize! Well, actually this time we’ll be making a base from scratch using Aves® ClayShay. It’s a lightweight compound that feels like clay, but sets up like mache. It’s base form is a powdery pulp you mix with water to form a paper-mush of sorts. The more water you add, the thinner it becomes. For today’s application we’ll be using less water to get the ClayShay thick in order to form earthy terrain.
Step 1: Mix it up baby!
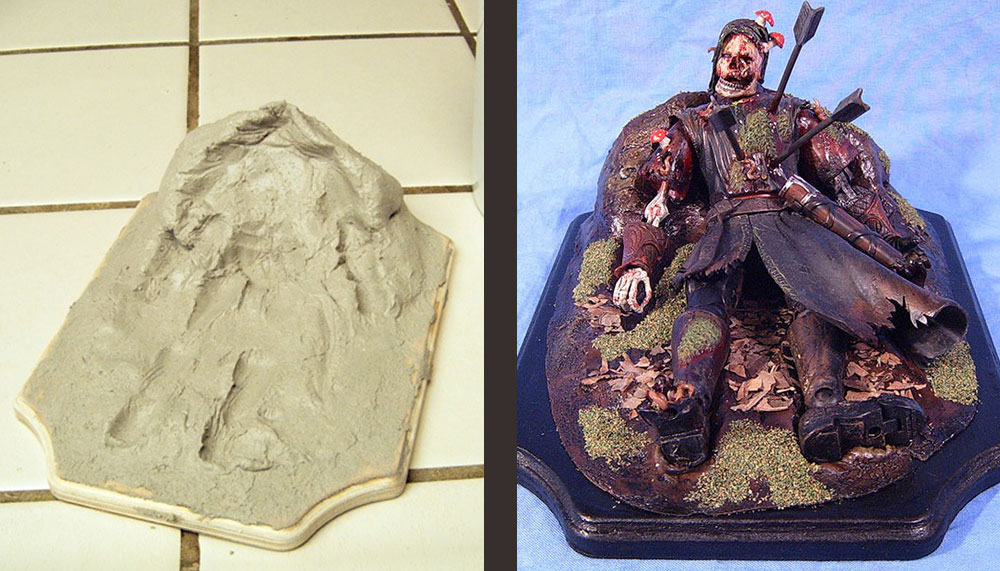
It’s simple, grab a mixing bowl and dump in about a cup of ClayShay, then mix it with your fingers, adding water little by little. The more water you add, the thinner it becomes. This allows you to make a rocky surface with less water, smoother surfaces with more water, or runny mud with lots of water. For this application we’re making a base for my Wormfood Boromir, which will need a little hill to prop him up, and has to look like the forest floor. I mixed just enough water in to make the ClayShay feel like a thick clay.
Step 2: Smear it on & start sculpting!
You need something to put the ClayShay on, and a little wooden plaque from the craft store works perfect. You’ll notice this stuff sticks to your fingers and makes quite a mess. That’s ok! It washes right off with water and is completely non-toxic. Lightly dip your fingers in water to sculpt the basic form of whatever you’re doing. Use your sculpting tools (whatever you have, or just your fingers) and start sculpting. Dip your tools into water occasionally to keep the ClayShay from sticking too much. You can add earthy details by dabbing at the surface with a dry sponge, scraping the edge of a butter knife over the surface, use your imagination!
Step 3: Making an imprint (optional)
For this base, I needed Boromir to sit ‘in’ the ground a little, sunken in a bit. I didn’t want to get the underside of my figure all gooey, so I laid down a piece of plastic wrap before I pushed him into the ClayShay. After I was done, I lifted up the wrap and smoothed out the wrinkles and added ‘earthy’ detail where needed.
Step 4: Curing time, painting, and finishing
Ok, the directions say “Set up time for product is about one hour. ClayShay is fully cured when moisture dries off in one to four days.” Well I don’t really like to wait that long and I made a pretty big mound of it on the base. We know what that means! It’s time for a Jin Saotome Workaround! If you want to speed up the curing time, you need to evaporate the water out of the ClayShay. To do that, set your oven to the LOWEST heat, usually the ‘warm’ setting right before the 200 degree mark. Toss in your ClayShay and base (assuming it’s wood and not plastic) in for about 45 minutes to an hour. My base cured perfectly, it didn’t burn or crack! Keep in mind this method is NOT endorsed by Aves and you’ll be taking full responsibility for putting your stuff in the oven, so be careful.
Anyway, you’ll know it’s cured when the ClayShay turns a lighter color and it’s rock hard. Let it cool down, then sand the edges and re-glue it to the base if it didn’t adhere right away. You can drill cured ClayShay and add sprigs of dried grass, glue on sand, gravel, small rocks, whatever you want, then paint it with regular acrylic paints. For my base I sanded the edges round, re-glued it to the wooden base, painted it brown, and gave it a black wash. I then glued on that miniature fake grass and real broken up leaves. Turned out pretty good for my first try I thought.
And there you have it! Aves® ClayShay is great for making a lightweight, durable base for your customs. It’s non-toxic and washes up with water. Head to Aves® Studios to read about their product and order it by phone.
Article is written,illustrated & published by: