
Tutorials
3D Repairs
Dec
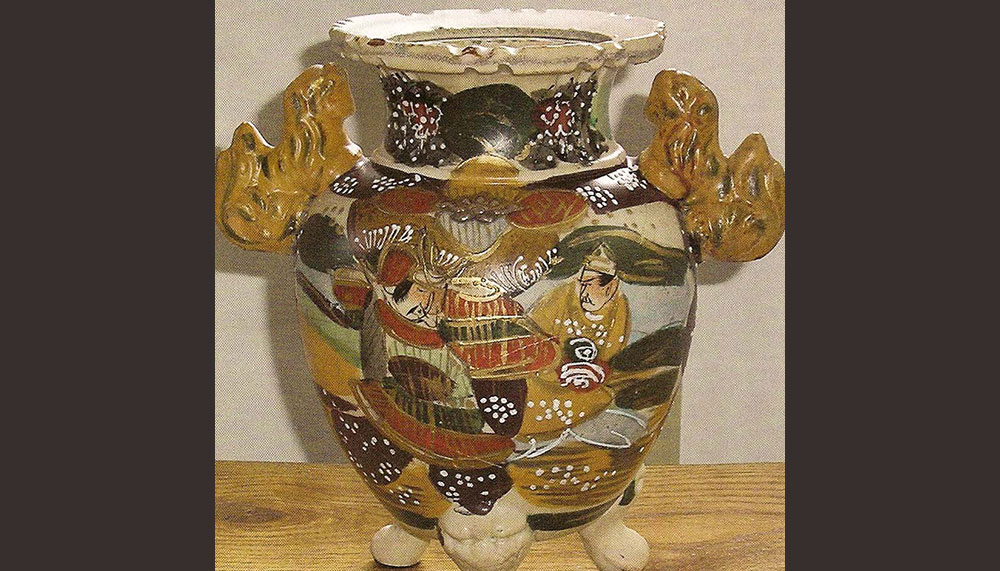
A family heirloom is knocked off a mantel by a cat! Years of history are shattered. What can you do?
The owner of this piece had no pictures of the vase to give the artist making the repair. The vase was in 22 large pieces and too many small ones to count- similar to a puzzle when you dump it out of a box. As you know there are many shapes of vases. The fragments revealed this vase was made of white ceramic clay, appeared to be glazed and hand painted and was highly detailed. It was estimated to be well over 100 years old and was passed through several generations of two different families, possibly more.
This was most certainly a three-dimensional puzzle. Much like a puzzle, I started with the obvious pieces. First, sort through the large chunks to locate the parts of the base and begin gluing the shape back to the form.
Devcon 5 Minute Epoxy was applied with a Popsicle stick to temporarily hold the pieces together. The base was in five main pieces. Once it was temporarily held together, FIXIT Paste was used to reinforce the base. At that point it was sturdy enough to hold the weight of the finished vase and pressure could be applied while working without worrying about it coming apart.
A sturdy foundation is a must. FIXIT Paste was applied to the inside using an old paintbrush. The cosmetics of this application are not important at this time since it will be 14 FIRED ARTS & CRAFTS resurfaced again later. Apoxie Safety Solvent and a light touch can be used 1· to smooth the paste. Clean up the cracks and edges of any excess paste so the repair doesn’t show an obvious glued edge.
NOTE: It is important to know that while this is a form of puzzle, one cannot just glue every piece instantly together. This must be a well-thought out process. In this case, the small pieces would not fit back in if they were glued right away. Holding these pieces freely together helped to find the right fit for all major pieces. Putting it together in “two halves” first makes it a lot easier to reinforce on the inside of the vase before the two final halves are joined.
One must use caution not to rub or break off its fitting edges and points on the other pieces when holding and test fitting to get an idea of what and where the next piece will go. The pieces almost “click” when you find its right place. If it looks like it fits, it probably does. With only two large halves remaining it was obvious how this would fit together.
When reassembling a broken object like this, the cracks create space. This is a problem because it is impossible to hold the exact original shape it once had. It will not fit perfectly back together as with any sphere-shaped object, after there is glue added to the seam of a crack extra space will be created. A coat of FIXIT Paste was applied to the inside of each remaining half, giving it an inner appearance that it had not been broken and providing reinforcement. Test fit the two parts (“halves”) several times using a triangular file to get into the corners and file down any questionable areas that were not fitting together due to the sphere shape and the adhesive paste, to give it a tighter fit.
Devcon 5 Minute Epoxy was used to hold the two halves together. While that cured a layer of FIXIT Paste was applied on the inside of the vase, over the large seam that went around the entire vase. A final layer of FIXIT Paste was applied to the inside and smoothed over with Apoxie Safety Solvent.
Now that the vase was in one piece the outside damage was easy to assess. A few chips, nicks and cracks remained. Prepping the outside surface for repair was easy. Very fine grade sandpaper was used on the seams of the cracks and a Dremel tool with a buffing tip was used to smooth off and shine up the images on the vase. This also removed any epoxy glue residue or finger prints that were accidentally left on the visible surface. A damp cloth was used to remove dust or particles and a dry micro fiber towel was rubbed over the surface.
FIXIT Sculpt was used to fill the cracks, nicks, and chips because of FIXIT Sculpt’s bone/porcelain texture, its light canvas color and industrial strength. It really matched the vase well.
Various paints were used to match the glazed finish and style of the picture. Life Tone airbrush paints, Testors hobby paints, and Liquitex acrylics were all mixed and matched to create custom colors and finishes to match the repair. Flex Stone Clear Kote matte finish was applied to the vase to complete the project.
This was quite an interesting experiment which turned out to be very valuable for this project.

What is it worth?